
To fix annoying drywall bulges caused by nail pops, start by removing loose paint and carefully driving a drywall screw or nail deeper into the stud to secure the drywall. Apply joint compound over the bump, feathering the edges smoothly, and let it dry completely. Sand the area flat and match the existing wall texture with appropriate tools. If you want to learn more about achieving seamless repairs, keep exploring the step-by-step techniques to restore your walls perfectly.
Key Takeaways
- Identify nail pops by spotting small bulges or bumps on the drywall surface.
- Remove loose paint or drywall around the bump and secure it with a drywall screw or nail.
- Apply joint compound over the bulge, feather the edges, and sand smooth after drying.
- Match existing wall texture using appropriate tools before painting for a seamless finish.
- Prevent future nail pops by using proper fasteners and installation techniques during drywall installation.

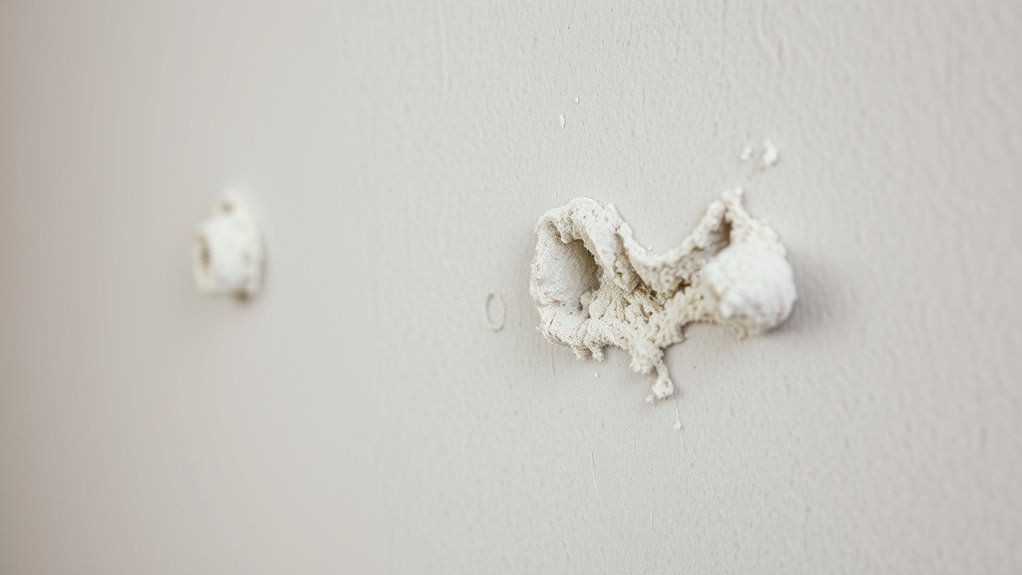
Nail pops are a common issue that can make your walls look uneven and unattractive. When you notice small bumps or bulges, it’s often caused by the nail or screw working loose from the drywall behind the surface. Over time, this movement pushes the drywall surface outward, creating an unsightly bump that catches your eye. Fortunately, fixing nail pops is straightforward, and you can do it yourself with a few simple tools. The key is to guarantee that the repair blends seamlessly with the rest of your wall, which is where texture matching comes into play. Proper drywall installation techniques, such as using the right fasteners and installing drywall correctly, can also help prevent future nail pops.
First, you need to prepare the area. Use a putty knife or a utility knife to gently remove any loose paint or drywall around the bump. Then, with a drywall screw or nail, secure the bulging area by driving it deeper into the stud behind the drywall. If the nail or screw is already loose, replacing it with a new drywall screw will provide a more secure hold. Once secured, apply a layer of joint compound over the bump, feathering the edges to blend it smoothly with the surrounding wall. Use a drywall knife to spread the compound evenly and ensure there are no ridges or bumps. Allow the compound to dry completely, usually a few hours, then sand it lightly to create a flat, smooth surface. Additionally, using proper fastening techniques during installation can significantly reduce the likelihood of nail pops recurring in the future. Incorporating consistent drywall techniques can also improve the long-term stability of your walls. Employing quality materials in your drywall projects can further enhance durability and prevent issues like nail pops from reappearing.
To achieve a professional finish, texture matching is essential, especially if your wall has a specific finish like knockdown or orange peel. Lightly apply additional joint compound if needed and then recreate the existing texture pattern with a sponge, brush, or spray. This step ensures your repair is invisible and seamlessly blends into the rest of the wall. If you’re working on a large area or your drywall installation was done without proper fastening, consider applying a skim coat of joint compound over the entire wall. This helps create an even surface and prevents future nail pops from developing. Proper drywall installation techniques are vital to minimize the chances of nail pops reoccurring and ensure a durable, smooth finish.
Top picks for "annoy drywall bulg"
Open Amazon search results for this keyword.
As an affiliate, we earn on qualifying purchases.
Frequently Asked Questions
Can Nail Pops Occur on Textured Walls?
Yes, nail pops can occur on textured walls. The textured surface doesn’t prevent nail pops, but it can make them less noticeable initially. Nail pop causes, like drywall shifting or wood expansion and contraction, still happen regardless of the wall’s texture. When nails push out, they create bulges or bumps, which may disrupt the textured finish. To fix this, you’ll need to secure the nail and blend it with the texture.
How Long Does It Take for Drywall Mud to Dry Completely?
In most cases, drywall mud takes about 24 hours to dry completely, but drying time varies based on thickness and humidity. For example, if you apply a thin layer of mud, it might cure faster, around 12-16 hours. Thick coats or high humidity extend drying time. To guarantee proper mud curing, wait at least 24 hours before sanding or painting, and always check if it’s dry to the touch.
Are There Permanent Solutions for Preventing Nail Pops?
Yes, there are long-term fixes and prevention methods for nail pops. You should securely fasten nails with proper drywall screws, avoiding over-tightening. Using drywall anchors can also help distribute weight evenly, reducing movement. Additionally, applying a quality joint compound and sanding smoothly creates a strong, durable finish. Regularly inspecting your walls and addressing early signs of movement can prevent nail pops from recurring, ensuring your walls stay smooth over time.
What Tools Are Best for Removing Old Nail Pops?
To remove old nail pops effectively, you should select the right tools for removal techniques. Use a pry bar or a hammer to gently lift the nail or screw from the drywall. Then, grab a putty knife to scrape away any protruding debris. Sand the area smooth with fine-grit sandpaper, ensuring a seamless surface. Proper tool selection makes the removal process easier and results in a professional-looking repair.
Can Humidity Levels Affect Drywall Stability?
You might think drywall stays stable, but high humidity levels can cause moisture impact, making it expand or contract. This fluctuation weakens the drywall’s attachment and can lead to bulges or nail pops. To prevent this, humidity control is essential; using dehumidifiers or ventilation helps maintain consistent moisture levels. By managing humidity, you make certain your drywall remains smooth and secure, avoiding future repairs and costly damage.
Conclusion
Now that you know how to fix nail pops, your wall can become as smooth as glass. Think of each repair as tightening a loose string on a guitar—bringing everything back into perfect harmony. With a little patience and the right tools, you’ll have your wall looking flawless in no time. So, roll up your sleeves and let your DIY skills shine; your wall is ready for its new, sleek chapter.