
To install a GFCI outlet, first turn off power at the breaker and test with a voltage tester to guarantee safety. Remove the faceplate and existing outlet, then identify the hot, neutral, and ground wires. Connect the hot wire to the line brass terminal, neutral to the silver terminal, and ground to the green terminal. Attach the GFCI, secure it, and test by pressing the “test” button. More details will guide you through each step accurately.
Key Takeaways
- Turn off power at the circuit breaker and verify no voltage with a tester before starting.
- Remove the existing outlet, note wiring connections, and ensure compatibility with the GFCI model.
- Connect the hot (black/red) wire to the line terminal, neutral (white) to the neutral terminal, and ground to the ground screw.
- Attach downstream outlets to the load terminals if protected circuit extension is needed.
- Restore power, then test the GFCI by pressing the “test” button and then “reset” to confirm proper operation.

Ever wondered how to improve your home’s safety near water sources? Installing a GFCI outlet is one of the best ways to protect yourself from electrical shocks. Before starting, it’s essential to understand circuit safety and outlet compatibility. Circuit safety means making sure your electrical system can handle the new outlet without overloading, while outlet compatibility ensures the GFCI fits properly into your existing wiring setup. If your current wiring uses older or incompatible outlets, you’ll need to upgrade or adapt it to match the GFCI’s requirements. This step prevents potential hazards and guarantees the outlet functions correctly. Incorporating connected home technology can further enhance your home’s safety and monitoring capabilities.
Enhance home safety by understanding circuit safety and outlet compatibility before installing a GFCI.
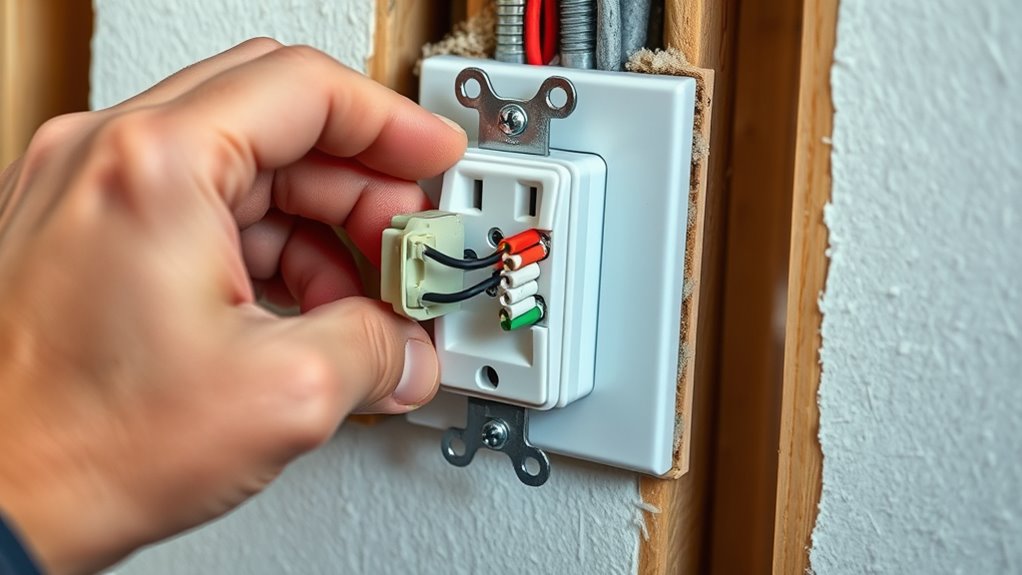
First, turn off the power at the circuit breaker to eliminate any risk of electrocution. Confirm that the power is off by testing the existing outlet with a voltage tester. Once you’re sure the circuit is dead, remove the faceplate and unscrew the existing outlet from the electrical box. Carefully pull out the outlet, exposing the wiring behind it. Take note of how the wires are connected, especially which wire is hot (usually black or red), neutral (white), and ground (green or bare copper). This is vital because proper wiring ensures the GFCI will work effectively. If you’re unsure about your wiring or if it’s outdated, consider consulting an electrician.
Next, check that your new GFCI outlet is compatible with your existing wiring setup. GFCI outlets typically have two sets of terminals for line and load connections. The line terminals connect to your power source, while the load terminals provide GFCI protection to downstream outlets. If your wiring setup doesn’t match this configuration, you might need to reconfigure your wiring or select a different GFCI model. Read the manufacturer’s instructions carefully to confirm outlet compatibility and proper wiring procedures.
Then, connect the wires to the GFCI outlet. Attach the hot wire to the brass terminal labeled “hot” or “line,” and the neutral wire to the silver terminal marked “neutral” or “line.” If you’re wiring additional outlets downstream, connect those to the load terminals as instructed. Make sure all connections are tight and secure to prevent loose wiring, which could cause faults or reduce safety. Finally, attach the GFCI to the electrical box, screw it in firmly, and replace the faceplate.
Before restoring power, double-check all connections and ensure the GFCI is properly installed. Turn the circuit breaker back on and test the GFCI by pressing the “test” button. The outlet should trip, cutting power. Press “reset” to restore power. This testing confirms your GFCI is functional and ready to protect you near water sources. By following these steps carefully, you’re enhancing your home’s safety while making certain the circuit remains safe and compatible for future use.
Frequently Asked Questions
Do GFCI Outlets Require Grounding?
GFCI outlets don’t require grounding to function properly, but grounding is still advised for safety considerations. Most GFCI outlets have a grounding terminal, and connecting it can help reduce the risk of electrical shock if a fault occurs. Check your local electrical codes, and if grounding is available, it’s best to connect the ground wire. This enhances safety and ensures your home’s wiring complies with standards.
Can I Install a GFCI Outlet Outdoors?
Did you know outdoor outlets are five times more likely to be damaged by weather? Yes, you can install a GFCI outlet outdoors, but make sure to use proper outdoor wiring and weatherproof covers. These covers protect the outlet from moisture and debris, ensuring safety and durability. Always follow local electrical codes and turn off power before installation. Proper outdoor setup keeps your electrical system safe and functional.
How Often Should GFCI Outlets Be Tested?
You should test your GFCI outlets at least once a month to make certain they’re functioning properly. Regular testing is essential for safety and quick detection of faults. Use the test button on the outlet, then press the reset button to restore power. As a maintenance tip, mark your calendar to remind yourself. Consistent testing helps prevent electrical shocks and keeps your home safe, especially in areas prone to moisture.
What Tools Are Needed for GFCI Installation?
You can’t build a house on a weak foundation, so start with the right tools for electrical safety and outlet wiring. Grab a screwdriver, voltage tester, wire strippers, and needle-nose pliers. These tools help guarantee safe, proper installation of your GFCI outlet. Always turn off power before working, double-check connections, and follow safety precautions, because a well-wired GFCI protects you from electrical shocks and keeps your home safe.
Can I Replace a Standard Outlet With a GFCI Myself?
Yes, you can replace a standard outlet with a GFCI yourself, but you must prioritize electrical safety. Turn off the power and carefully follow proper outlet wiring techniques to connect the GFCI correctly. Make sure the ground and hot wires are secure and match the outlet’s terminals. If you’re unsure, consult a professional. Proper installation guarantees safety and prevents electrical hazards, giving you peace of mind in your home.
Conclusion
Now that you’ve learned how to install a GFCI outlet, you’re ready to improve your home’s safety easily. Remember, turning off the power before working is essential—don’t skip this step! With a little patience, you can confidently handle this task yourself. So, why not take control of your electrical safety today? Imagine a safer, more secure home where accidents are less likely—installing a GFCI outlet is a simple step toward that peace of mind.