
To improve insulation around your windows, you should remove old, cracked caulk and replace it with fresh, high-quality material like silicone or acrylic latex caulk, depending on the area. Start by scraping away the deteriorated caulk, clean the surface thoroughly, and apply new caulk smoothly, sealing all gaps. Finishing with proper tools guarantees a tight, weather-resistant seal that reduces drafts and boosts energy efficiency. Continuing with these steps will help you achieve a lasting, effective window seal.
Key Takeaways
- Identify signs of deteriorated caulk, such as cracks, peeling, or drafts, indicating the need for recalking.
- Remove all old, damaged caulk using a utility knife or putty knife for a clean surface.
- Choose the appropriate caulk type (silicone or acrylic latex) based on whether the window is interior or exterior.
- Apply painter’s tape along edges to ensure neat lines, then use a caulk gun for smooth, controlled sealing.
- Smooth the new caulk immediately, remove tape before curing, and allow proper drying to enhance insulation and prevent leaks.

If your windows have begun to show signs of wear or leaks, recalking is a simple yet effective way to restore their seal and prevent further damage. Over time, the caulk around your windows can crack, peel, or shrink, letting in drafts, moisture, and reducing energy efficiency. Replacing old, deteriorated caulk with fresh, high-quality material can markedly improve insulation and protect your home. Before starting, it’s vital to understand the different types of caulk available. Silicone caulk is popular because it’s flexible, waterproof, and long-lasting, making it ideal for exterior windows exposed to the elements. Acrylic latex caulk is easier to work with, clean up, and paint over, making it suitable for interior windows or areas where flexibility isn’t as critical. Polyurethane caulk offers excellent durability and adhesion but can be more challenging to apply and clean. Choosing the right caulk depends on your specific needs, climate, and whether the area is interior or exterior.
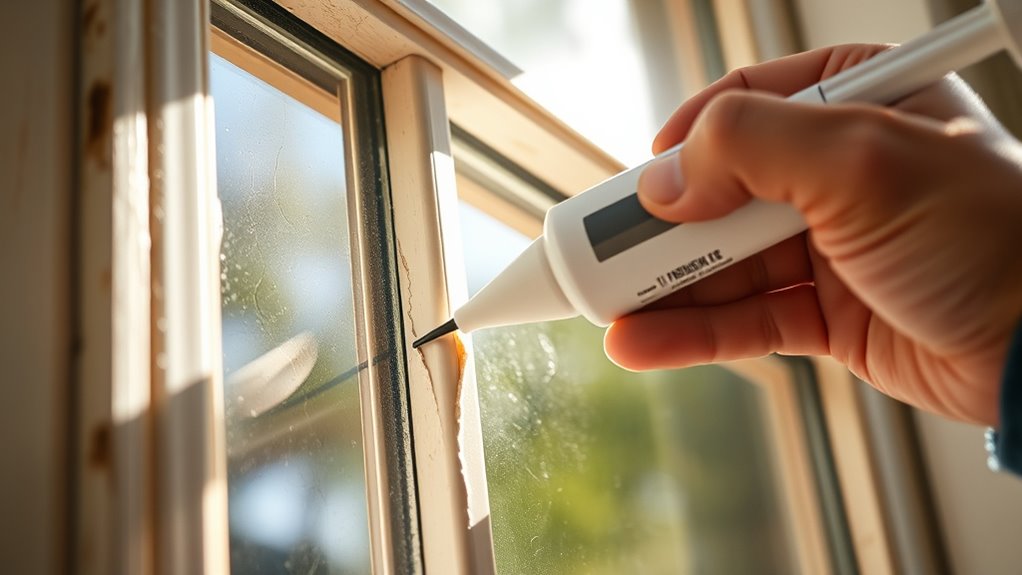
Once you’ve selected the appropriate type of caulk, gather the necessary tools for recalking. You’ll need a caulk gun, which provides controlled application and helps you dispense the material smoothly. A utility knife or putty knife is essential for removing the old, cracked caulk — make sure to cut along the edges carefully to avoid damaging the window frame. A wire brush or stiff-bristled brush can help clean out any remaining debris or residue left behind. For smoothing the new caulk, a caulking tool or your finger dipped in soapy water works well, ensuring a clean, even bead. Masking tape can be useful for creating neat lines and protecting surrounding surfaces, especially if you’re working on visible areas. Remember to wear gloves to keep your hands clean and protect your skin from the caulk, which can sometimes cause irritation.
Preparing the area properly is essential. Start by removing all the old caulk, ensuring you get down to a clean, dry surface. Use a utility knife or putty knife to carefully scrape away the deteriorated material, then clean the area with a damp cloth or mild cleaner. Once dry, apply painter’s tape along the edges to achieve a tidy appearance. Load your caulk gun with the chosen caulk, cut the nozzle at a 45-degree angle, and puncture the seal inside the tube. When applying, hold the gun at a consistent angle and steady pressure, moving smoothly along the joint. Finish by smoothing the bead with your finger or a tool, then remove any painter’s tape before the caulk fully cures. With these tools and techniques, you’ll guarantee a tight, weather-resistant seal that enhances your home’s insulation and keeps drafts out.
Frequently Asked Questions
How Often Should I Recalk My Windows?
You should recalk your windows every 3 to 5 years to maintain effective window sealing and weatherproofing. Over time, caulk can crack or peel, compromising insulation and letting in drafts. Regularly inspecting your windows helps identify when resealing is needed. Using proper weatherproofing techniques ensures your home stays energy-efficient and protected from moisture. Keep an eye on how well your windows seal, and don’t hesitate to recalk when necessary.
Can Recalking Improve Energy Efficiency?
Yes, recalking can improve your home’s energy efficiency by sealing gaps and preventing drafts. When you update your window weatherization, you reduce heat loss and lower your energy bills. Choose caulk color options that match your window trim for a seamless look. Applying fresh caulk guarantees your windows stay well-insulated, making your home more comfortable and energy-efficient throughout the year.
What Tools Are Best for Recalking Windows?
You’ll want a caulking gun to apply the caulking materials effectively during window sealing. Choose a high-quality, silicone or acrylic caulk designed for exterior use, as they provide durable, weather-resistant seals. A utility knife helps remove old caulk, while a putty knife smooths the new sealant. Additionally, a caulk finish tool can help create a clean, professional-looking finish, ensuring your window sealing is airtight and energy-efficient.
Is Recalking a DIY or Professional Job?
Did you know nearly 70% of DIY projects turn out well, but recaulking windows is often best left to professionals? While it’s possible to do it yourself with the right tools and patience, a professional service guarantees a perfect seal, preventing drafts and saving you money in the long run. If you’re unsure about your skills, hiring experts guarantees better insulation and avoids costly mistakes.
How Long Does Recalking Typically Last?
Recalking typically lasts about 5 to 10 years, depending on caulk durability and weather impact. If you choose high-quality, weather-resistant caulk, it can stay intact longer, protecting your windows from drafts and water damage. Harsh weather conditions, like extreme heat or cold, can shorten its lifespan. Regular inspections and touch-ups help make certain your caulk remains effective, extending its durability and keeping your home well-insulated.
Conclusion
Recalking your windows is like giving a knight new armor—protecting your home from the elements and keeping your comfort intact. With fresh caulk, you’ll see your energy bills shrink and your space stay cozy, just as a fortress stands strong against invaders. So, channel your inner hero, roll up your sleeves, and reclaim your castle’s defenses. After all, a well-sealed home is the secret to peace of mind, much like a well-guarded treasure.