
Set up smart home devices by connecting each one to your Wi-Fi, adding it in the manufacturer’s app, and testing its controls. This guide is for beginners setting up devices such as smart bulbs, plugs, speakers, cameras, or thermostats. Allow 30-90 minutes; the exact time depends on how many devices you have and whether your Wi-Fi needs adjustments.

Get everyday essentials delivered free with Prime
- Fast, free delivery on millions of items
- Prime Video, Amazon Music and more included
- Member-only deals all year

Amazon Echo Show 15 (2nd Gen), 15.6" Full HD Smart Display with Fire TV and Alexa
- ✔ Display: 15.6-inch Full HD, 1920 x 1080
- ✔ Dimensions: 16.1 x 10.1 x 1.4 inches
- ✔ Weight: 4.96 pounds
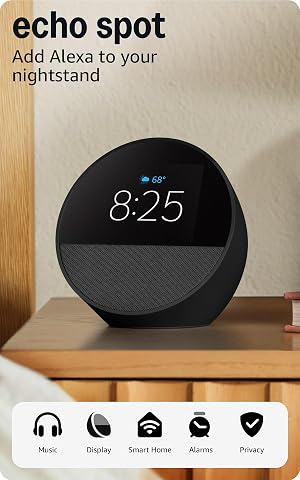
Amazon Echo Spot Smart Alarm Clock with Alexa (Black)
- ✔ Display: 2.83-inch touch screen, 240 x 320
- ✔ Dimensions: 4.5 x 4.1 x 4.4 inches
- ✔ Weight: 14.3 ounces

Sonos Era 100 Wireless Smart Speaker (White)
- ✔ Model: Sonos Era 100
- ✔ Connectivity: Wi-Fi, Bluetooth, and USB; line-in via adapter
- ✔ Voice assistant: Amazon Alexa
Difficulty: Beginner | Time: 30-90 minutes, depending on the number of devices
What You’ll Need
Tools & Materials:
- Smart home device and any included accessories
- Smartphone or tablet
- Manufacturer’s app, downloaded from the Apple App Store or Google Play
- Home Wi-Fi name and password
- A stable internet connection
Knowledge:
- Basic smartphone use, including installing an app and connecting to Wi-Fi
- How to find your home Wi-Fi network name and password
- How to follow the device manufacturer’s setup and placement instructions
Check the device box or product page for network requirements before setup. Some devices need a 2.4 GHz Wi-Fi network, a separate hub, or a specific phone operating system. Make sure the device is compatible with your Wi-Fi and any smart home platform you plan to use. Keep the setup instructions and account details handy.
Amazon Echo Show 15 (2nd Gen), 15.6" Full HD Smart Display with Fire TV and Alexa
For households that want one visible place to check routines and reach connected devices, the Echo Show 15 (2nd Gen) is the most complete option here. Its 15.6-inch screen can show customizable widgets and a smart home dashboard, while support for Zigbee, Matter, and Thread gives it a wider hub role than the Echo Spot. This makes it a better fit for shared spaces where several people need quick access to home information.The display also doubles as a Fire TV screen, and its 13 MP camera includes auto-framing and a physical shutter for video calls with a privacy control close at hand. That breadth comes with a placement cost: at nearly five pounds and over 16 inches wide, it needs a deliberate wall or countertop location. Compared with the smaller Spot, it is far less convenient to tuck away; compared with the Era 100, it brings more home controls but is not the choice for audio-first listening. Buyers should also check their network needs, since it does not support ad-hoc Wi-Fi networks.
Pros:
- 15.6-inch Full HD screen supports landscape and portrait placement
- Smart home hub supports Zigbee, Matter, and Thread
- Built-in Fire TV and customizable widgets broaden everyday use
- 13 MP camera with auto-framing, zoom, and physical shutter
Cons:
- Large footprint requires a wall mount or dedicated counter space
- Does not support ad-hoc Wi-Fi networks
- Its screen-centered design is less suited to compact rooms than the Echo Spot
Best for: Households that want a shared kitchen or living-area dashboard with broad smart home protocol support, video calls, and streaming in one place.
Not ideal for: People with limited wall or counter space, or anyone who mainly wants a compact bedside speaker or room-focused music system.
Bottom line: We recommend the Echo Show 15 when visible, shared smart home control matters more than saving space.
“We recommend the Echo Show 15 when visible, shared smart home control matters more than saving space.”
Amazon Echo Spot Smart Alarm Clock with Alexa (Black)
The Echo Spot is the easiest of these three to place where a smart home routine begins and ends: beside the bed. Its compact touch display keeps time, weather, or song information in view, while Alexa can handle voice requests and connected devices. Unlike the Echo Show 15, it does not try to become a household dashboard; its strength is making a small, useful control point available without taking over a counter or wall.Its distinguishing extra is eero Built-in, which can extend coverage by up to 1,000 square feet when paired with a compatible eero router and account. That can make it a more practical purchase for an eero household, but it should not be counted as a universal Wi-Fi extender. The small screen and single 1.73-inch speaker are also more limited than the Show 15’s large visual workspace or the Era 100’s stereo-focused sound. For bedside alarms and simple Alexa access, that restraint is a benefit; for complex home control or serious listening, it is a compromise.
Pros:
- Compact shape suits nightstands, desks, and smaller counters
- Touch display can show time, weather, and song information
- eero Built-in can extend compatible eero networks
- Physical microphone-off button and app privacy controls
Cons:
- eero extension requires compatible eero equipment and account linkage
- Small display is not a substitute for the Echo Show 15 dashboard
- No camera and limited speaker scale compared with the other picks
Best for: People who want an Alexa alarm clock for a nightstand or desk, especially those already using a compatible eero router.
Not ideal for: Buyers who need a large smart home dashboard, broad protocol hub support, or stereo room audio.
Bottom line: We’d choose the Echo Spot for bedside Alexa routines, particularly when its eero feature matches an existing home network.
“We’d choose the Echo Spot for bedside Alexa routines, particularly when its eero feature matches an existing home network.”
Sonos Era 100 Wireless Smart Speaker (White)
When listening is the daily task that matters most, the Sonos Era 100 is the standout. Its dual-tweeter architecture is designed for stereo separation, and the larger midwoofer supports fuller bass than a compact bedside speaker like the Echo Spot. Trueplay tuning adjusts the sound to the room, helping this pick serve as a dedicated speaker rather than a small voice assistant with music playback added on.It remains useful in a smart home through built-in Alexa and flexible streaming over Wi-Fi or Bluetooth, with line-in available through a separate adapter. Compared with the Echo Show 15, it gives up the screen, widgets, and broad Zigbee, Matter, and Thread hub role; compared with the Spot, it gives listening more room to breathe but takes a more focused role. It also needs corded power and is not water-resistant, so a bathroom shelf or portable listening setup is a poor match. Choose it for a stable indoor listening spot, not as the household’s visual command center.
Pros:
- Dual-tweeter design supports stereo separation
- Larger midwoofer is aimed at fuller bass than a small clock speaker
- Trueplay tuning adapts EQ to room acoustics
- Wi-Fi, Bluetooth, and optional line-in support varied sources
Cons:
- Line-in requires a separate adapter
- Corded power means it is not portable
- Not water-resistant and lacks the Echo Show 15’s visual hub features
Best for: Listeners who want a compact, room-tuned speaker with Alexa access and multiple ways to play audio.
Not ideal for: Shoppers seeking a screen-based home dashboard, a portable speaker, or a device suited to wet rooms or outdoor use.
Bottom line: We recommend the Era 100 when stronger, room-tuned music playback is more important than a smart home screen.
“We recommend the Era 100 when stronger, room-tuned music playback is more important than a smart home screen.”
As an Amazon Associate we earn from qualifying purchases.
Before You Start
Choose a location near a reliable Wi-Fi signal, but follow the manufacturer’s safety and placement guidance. For electrical devices, check the rated voltage and load before connecting appliances. Do not use a smart plug with equipment that the plug’s instructions say is unsupported, such as some high-power or life-safety devices. Use a unique password for the manufacturer account, enable multifactor authentication if offered, and install app or device updates from the official app. If setting up a camera, decide where it can record without capturing private areas unnecessarily.
Step-by-Step Instructions
Step 1: Check compatibility and network requirements
Read the device’s setup guide or product page. Note whether it requires a hub, a particular Wi-Fi frequency, Bluetooth during setup, or a compatible phone or smart home platform. Confirm that your router provides the required network and that you have access to its Wi-Fi name and password. If you use a combined 2.4 GHz and 5 GHz network, follow the device instructions; some devices need the phone to be connected to the 2.4 GHz band during setup.
Tip:Do not assume that two products with the same smart home logo will work together. Check the exact model and supported features.
Check: You can name the network requirements, have the needed accessories, and know which app or platform to use.
Step 2: Install the official app and prepare your account
Find the manufacturer’s app in your phone’s official app store and install it. Open the app, create an account or sign in, and grant only the permissions needed for setup and use. Use a strong, unique password. Turn on multifactor authentication if the app supports it, and confirm that your phone is connected to your home Wi-Fi.
Tip:Avoid setup links or app downloads from unexpected messages or unofficial websites.
Check: The official app opens, you can sign in, and your phone is connected to the intended home network.
Step 3: Power the device and put it in setup mode
Place the device where you can safely reach it during setup. Connect it to power or install its batteries as directed. Wait for it to start, then use the setup button or reset procedure only as described in the instructions. Look for the indicator light or sound that signals pairing mode. If the device was previously used, follow the manufacturer’s instructions for resetting it before adding it to your account.
Tip:Do not hold buttons at random: a reset can erase settings or remove the device from another account.
Check: The device is powered and shows the documented pairing signal.
Step 4: Add the device in its app
Open the app and choose the option to add or set up a device. Select the correct product type and model if prompted. Follow the on-screen directions to discover the device, scan a setup code, or connect to it over Bluetooth. When asked, enter your home Wi-Fi password carefully. Keep your phone near the device and leave the app open while it connects.
Tip:If setup fails, check the Wi-Fi password and network band before repeating the process. Avoid resetting the device unless the app or instructions call for it.
Check: The app reports that setup is complete and shows the device as connected or available.
Step 5: Name the device and set its location
Give the device a short, specific name, such as “Kitchen lamp” or “Front door camera.” Assign it to the correct room if the app offers rooms. Use names that are easy to recognize when you add voice control or automations. For a camera or microphone, review privacy settings, notification preferences, and recording options before leaving the setup screen.
Tip:Names like “Lamp 1” become hard to distinguish when you add more devices. Include the room or purpose.
Check: The app displays the right device name and room, and its privacy and notification settings match your needs.
Step 6: Update the device and review security settings
Open the device settings in the app and check for firmware updates. Install available updates while the device has power and a stable connection; wait for the app to say the update is finished. Review account access, shared users, remote access, and notification settings. Remove access for people who should no longer control the device.
Tip:Do not unplug or power off the device during an update. Some updates take several minutes and may briefly restart it.
Check: The app shows the update as complete or confirms that the device is current, and the listed users are expected.
Step 7: Test the device from the app
Use the app to try the device’s main function. Turn a bulb on and off, switch a plug, play a short audio clip, or check the camera’s live view, as appropriate. Try the control again from the location where you expect to use it. For battery-powered or portable devices, check the battery indicator and follow any placement guidance.
Tip:Test one device at a time so you can tell which device or setting needs attention.
Check: The device responds promptly, shows the expected state in the app, and remains connected after you move your phone away.
Step 8: Connect a smart home platform or create a simple routine
Open the supported platform’s app and follow its instructions to link the manufacturer’s account or discover the device if you want voice control or shared controls. Review the requested access before confirming. Test one simple command or routine, such as turning on a named lamp, and check that it affects only the intended device. Skip this step if you plan to use the manufacturer’s app alone.
Tip:Keep routine names and triggers specific. A broad voice command or schedule can activate the wrong device.
Check: The platform lists the device and the test command or routine produces the expected result.
Common Mistakes to Avoid
- Trying to pair a device with an unsupported Wi-Fi band or network. — Check the model’s network requirements first. Follow the setup instructions for dual-band routers, guest networks, or separate network names.
- Entering the Wi-Fi password incorrectly or selecting a neighbor’s network with a similar name. — Confirm the exact network name and password from your router or saved network settings before starting setup.
- Placing the device where the wireless signal is weak. — Test the connection at the intended location, and move the device or improve coverage if it repeatedly disconnects.
- Using vague names or creating an overly broad routine. — Name devices by room and purpose, then test each command or trigger before relying on it.
Troubleshooting
Problem: The app cannot find the device.
Solution: Check that it is powered and in pairing mode, keep your phone nearby, and enable Bluetooth if the instructions require it. Close and reopen the app, then retry. Confirm the device is not already attached to another account; follow the manufacturer’s reset instructions if needed.
Problem: The device rejects the Wi-Fi password or fails during network setup.
Solution: Re-enter the password, checking capitalization and special characters. Verify that the router uses a supported network band and security setting. Temporarily move the device closer to the router and follow the manufacturer’s steps for connecting through a dual-band network.
Problem: The device appears offline after setup.
Solution: Check the router’s internet connection and the device’s power. Move the device closer to the router, restart it using the approved procedure, and check the app for service or firmware notices. If it remains offline, remove and re-add it only after checking the product’s recovery instructions.
Problem: A voice command or routine controls the wrong device or does nothing.
Solution: Confirm that the device is linked to the correct platform account and assigned to the right room. Use its precise name in the command, check routine permissions and triggers, and test with a simple manual command before restoring a schedule.
What Success Looks Like
Your device appears in the manufacturer’s app with the correct name and room, responds to its main control, and stays connected in its intended location. Any linked platform or routine performs the test action you set up. You can identify who has access, locate the privacy settings, and tell whether the device needs an update.
Next Steps
Set a reminder to review app permissions, shared access, firmware updates, and notification settings periodically. Check the device after router or password changes, since it may need to reconnect. Add more devices one at a time and test each before building routines that depend on several devices. Keep setup instructions and account recovery details in a secure place.
Frequently Asked Questions
Do all smart home devices need Wi-Fi?
No. Some connect through a hub using a protocol such as Zigbee or Thread, while others use Bluetooth or a wired connection. Check the product’s requirements and whether a separate hub is needed.
Can I set up a smart device without a hub?
Some devices connect directly to Wi-Fi or Bluetooth and do not need a hub. Others require one for setup or for features such as local control. The product documentation lists the required equipment.
Why does setup fail when my Wi-Fi works on my phone?
The device may support only a particular Wi-Fi band or security setting, or it may be too far from the router. Check its network requirements and try setup near the router while following the manufacturer’s dual-band instructions.
Should I use the same password for every smart home account?
No. Use a unique password for each account, and turn on multifactor authentication when available. This limits the effect if one account password is exposed.
How can I tell whether a device is compatible with my smart home platform?
Check the exact model in the platform’s supported device list and the manufacturer’s specifications. Confirm which features are supported, since a device may pair while some controls or routines remain unavailable.