To fix a leaning fence post, start by inspecting the post for rot, damage, or loose soil, then excavate around it to assess the foundation. Use temporary supports like braces or stakes to straighten the post, then fill the hole with concrete or gravel for stability. Reinforce with brackets or additional stakes if needed. Proper maintenance can prevent future issues—keep exploring to learn all the techniques for a long-lasting fence repair.
Key Takeaways
- Inspect the post for rot, cracks, or damage, and test stability by gently wiggling it.
- Excavate at least 12 inches around the post to assess foundation issues and soil conditions.
- Temporarily stabilize and align the post using stakes, braces, and a level before permanent repair.
- Fill the hole with concrete or gravel to secure the post, ensuring proper curing before removing supports.
- Reinforce with cross-bracing, support brackets, and regular maintenance to prevent future leaning or damage.

2 Pcs Fence Post Repair Kit, Heavy Duty Fence Post Anchor Ground Stakes for Repair Tilted, Broken Wood Support
- Package Includes: 2 repair stakes, screws, wrench
- Durable and Long-Lasting: Prevents fence tilting and collapse
- Premium Material: Heavy-duty steel, rust-resistant coating
As an affiliate, we earn on qualifying purchases.
As an affiliate, we earn on qualifying purchases.
Identifying the Causes of a Leaning Fence Post
A leaning fence post often signals underlying issues that need your attention. Soil erosion around the base is a common culprit, especially after heavy rain or poor drainage. Over time, water can wash away supporting soil, making the post unstable. Wooden posts are also susceptible to rot at or just below ground level, weakening their structure. Frost heave in colder climates can push posts upward or out of alignment, causing leaning. Improper installation, like shallow planting or inadequate backfill, leads to instability from the start. Additionally, animal activity or landscaping work can disturb the soil or foundation, shifting the post’s position. Recognizing these causes helps you determine whether the problem stems from environmental factors, poor initial setup, or ongoing soil conditions. Soil stability is crucial for maintaining the upright position of your fence posts over time.

Postloc® – 1-Post Kit – Easy to Use Concrete Alternative (1)
- Universal Compatibility: Works with all post types
- Tool-Free Installation: No tools needed
- User-Friendly Design: Easy to use
As an affiliate, we earn on qualifying purchases.
As an affiliate, we earn on qualifying purchases.
Inspecting and Assessing Post Damage

Start by looking for obvious signs of damage like rot, cracks, or breaks at the base of the post. Then, test its stability by gently pushing or wiggling it—excessive movement signals issues. Finally, assess whether the post still supports the fence properly or if it needs to be replaced. For a more sustainable approach, consider natural pool options that integrate eco-friendly materials and landscaping to enhance your backyard’s resilience. Additionally, understanding deep-sky imaging techniques can inspire innovative ways to incorporate natural elements into your outdoor space. Incorporating simple systems for regular inspections can help catch problems early and prevent further damage, such as using preventative maintenance strategies to prolong the life of your fence.
Visual Damage Indicators
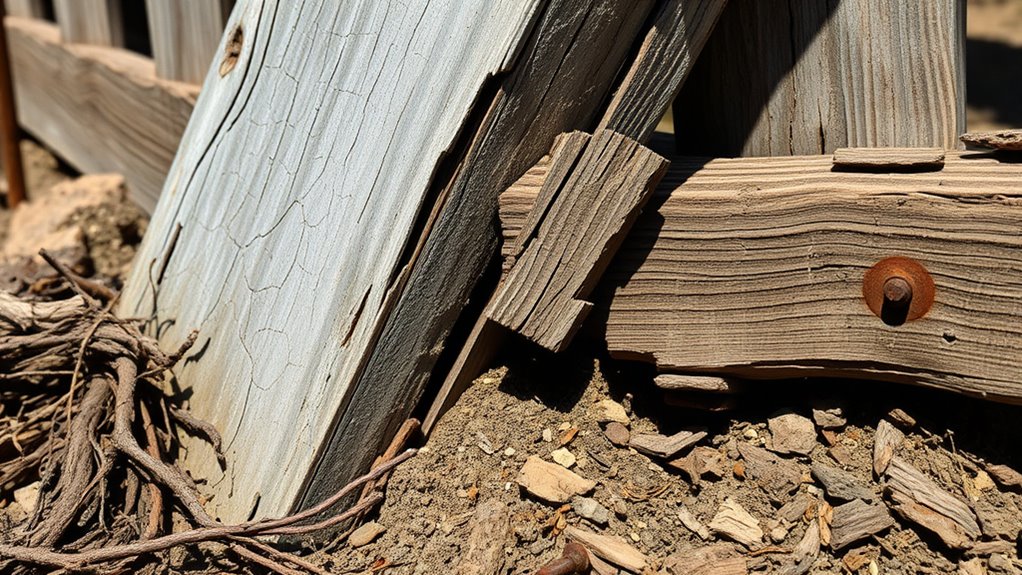
When inspecting fence posts for damage, look for visible signs that indicate structural issues. Check the post’s base and surrounding area for rot, cracks, or splinters, especially at ground level. Look for any discoloration or mold, which suggests decay. Observe if the post appears warped, bent, or cracked, indicating stress or damage. Notice if the wood is soft or crumbly when touched. Examine for sagging or unevenness that might reveal shifting or instability. Also, inspect the fence panels connected to the post—loose or misaligned panels can signal post movement. Finally, look for evidence of insect activity, such as holes or sawdust, which can weaken the wood. Identifying these signs early helps determine if a repair or replacement is needed. Additionally, understanding the structural integrity of wooden posts can aid in assessing overall stability and safety. Recognizing early damage signs can prevent further deterioration and costly repairs. Regular inspection and maintenance are key components of effective quality assurance, ensuring the longevity and safety of your fence. Being aware of environmental factors, such as exposure to moisture or pests, further supports proactive maintenance strategies. Moreover, tracking weather conditions that may accelerate deterioration can help in planning timely interventions.
Structural Stability Check
To assess the structural stability of a fence post, begin by applying gentle pressure to check for movement; excessive wobbling indicates the post may be loose or compromised. If the post shifts easily, it’s a sign that the foundation is weak. Observe whether the post feels firm or if it wobbles side to side or vertically. Check for cracks, rot, or damage at the base, which can weaken its support. Also, see if neighboring posts are similarly unstable or if the entire fence is affected. Take note of how much the post leans and whether the movement worsens under pressure. This inspection helps determine if the post needs realignment, reinforcement, or complete replacement to restore the fence’s stability and prevent further leaning. Additionally, understanding the lifecycle and performance metrics of fence posts can provide insight into when reconditioning or replacement might be necessary.

4 Pack Fence Post Repair Kit, Heavy Duty Steel Ground Spike Anchor for Fixing Leaning or Broken 4×4 & 6×6 Wood Posts, No Dig Drive-in Support for Yard, Garden & Fence
- Quick Fence Post Repair: Fix leaning or broken posts fast
- Heavy Duty Steel Construction: Provides strong, durable support
- No Dig Installation: Drive spike into ground easily
As an affiliate, we earn on qualifying purchases.
As an affiliate, we earn on qualifying purchases.
Excavating Around the Post for Inspection and Repair

Before inspecting or repairing a leaning fence post, you need to carefully excavate around it to expose the foundation. Dig at least 12 inches deep with a shovel, removing soil evenly around the post. Use a pry bar to loosen stubborn soil or concrete, revealing the base. This step helps you identify issues like rot, soil erosion, or concrete failure. To stay organized, consider this table:
| Action | Tools Needed | Purpose |
|---|---|---|
| Remove soil | Shovel, pry bar | Expose foundation |
| Clear debris | Broom or brush | Improve inspection visibility |
| Check for damage | Visual inspection | Identify rot, cracks, or instability |
| Assess soil condition | Hand feel, visual | Detect erosion or loose soil |
| Prepare for repairs | Gloves, level | Ensure proper realignment |
Careful excavation guarantees the foundation for effective inspection and repairs. Additionally, understanding the soil condition can help prevent future leaning issues by addressing underlying problems early, such as soil erosion or inadequate drainage. Conducting a thorough soil analysis can provide valuable insights into the health of your fence’s foundation and guide proper repair strategies. Proper assessment of the soil stability is crucial for long-term fence integrity and can help you take preventive measures. Moreover, employing proper excavation techniques minimizes the risk of damaging the post or surrounding structures during repair.

2pcs Fence Post Repair Kit – Fix Rotted or Damaged Wood Posts Without Replacement! Heavy-Duty Steel Brackets & Concrete Anchors for Permanent Stabilization
- Package Includes: 2 repair stakes, screws, and wrenches
- Size and Dimensions: 32-inch stakes, 1.96” x 31.5”
- Deep Ground Penetration: 15.75-inch soil depth
As an affiliate, we earn on qualifying purchases.
As an affiliate, we earn on qualifying purchases.
Methods for Straightening and Stabilizing the Post

To straighten and stabilize your fence post, start by using a level to ensure it’s perfectly vertical. You can then add temporary supports like braces or stakes to hold it in place while you work. Proper alignment is vital, so double-check with string lines to keep everything even before finalizing the repair. Additionally, inspecting the soil stability around the post can prevent future leaning issues and ensure lasting support. Ensuring proper post installation techniques can significantly reduce the chances of your fence leaning again. Also, applying appropriate fence repair methods can help maintain the overall durability of your fence structure. Taking steps to improve drainage around the post area can further prevent soil erosion and maintain stability over time, especially when considering soil erosion control strategies.
Using a Level and Bracing
When straightening a leaning fence post, using a level is essential to guarantee it stands perfectly vertical. Place the level on the post, adjusting until bubble is centered. To stabilize, brace the post with wooden stakes driven into the ground at an angle, creating a supportive triangle. Secure the stakes with nails or screws, then attach braces from the stakes to the post. Use string lines to ensure the post aligns with neighboring posts. This step prevents future leaning while you work. Here’s a quick overview:
| Step | Tool Needed | Purpose |
|---|---|---|
| 1 | Level | Check vertical alignment |
| 2 | Wooden stakes | Provide temporary support |
| 3 | Braces (wood or metal) | Stabilize the post |
| 4 | String line | Align with adjacent posts |
This method guarantees your post stays upright during repairs.
Temporary Supports and Alignment
After ensuring the post is plumb with a level, the next step is to stabilize it using temporary supports. You can do this with wooden stakes or braces that hold the post in the correct position. Drive stakes into the ground on either side of the post, and attach them securely with nails or screws. You might also use adjustable braces or straps for a tighter hold. To keep everything aligned, use string lines to match the post with neighboring ones, ensuring uniformity. Visualize these supports as hands holding the post upright, preventing any movement. Once secured, double-check the alignment with your level before moving on. These supports give you a stable base for further repairs or concrete setting.
Using Concrete for a Long-Lasting Fix
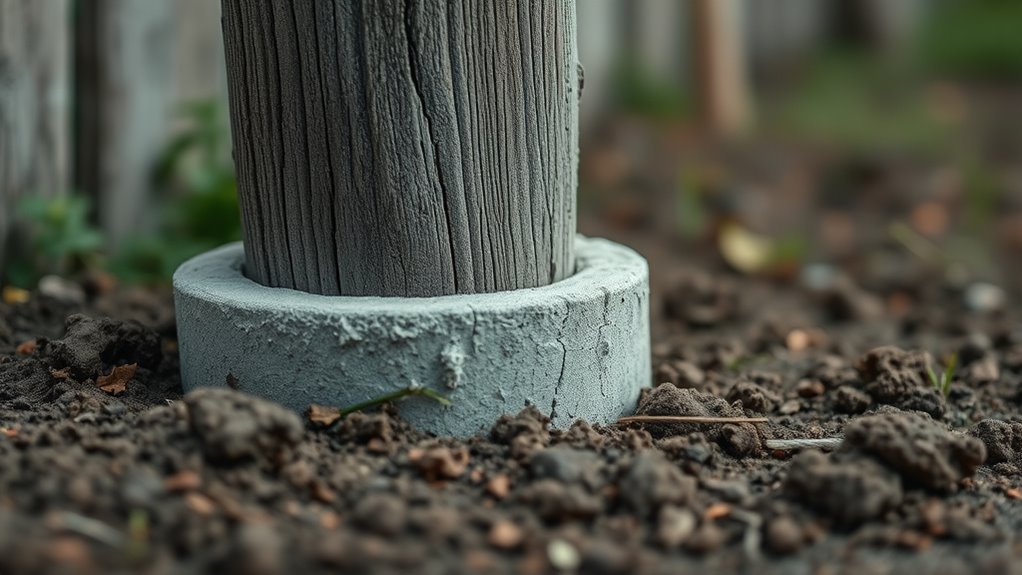
Using concrete to repair a leaning fence post offers a durable and long-lasting solution that restores stability effectively. First, ensure the post is straight and secure it temporarily with stakes or braces. Mix the concrete according to the manufacturer’s instructions, aiming for a firm, workable consistency. Pour the concrete into the excavated hole around the post, filling it completely. Use a shovel or trowel to eliminate air pockets and level the surface. Hold the post steady until the concrete begins to set, typically 24 hours. Avoid disturbing the post during this curing period. Once hardened, remove the temporary supports. The concrete will bond with the soil and provide a solid foundation, considerably extending the life of your fence.
Alternative Repair Options: Gravel and Brackets
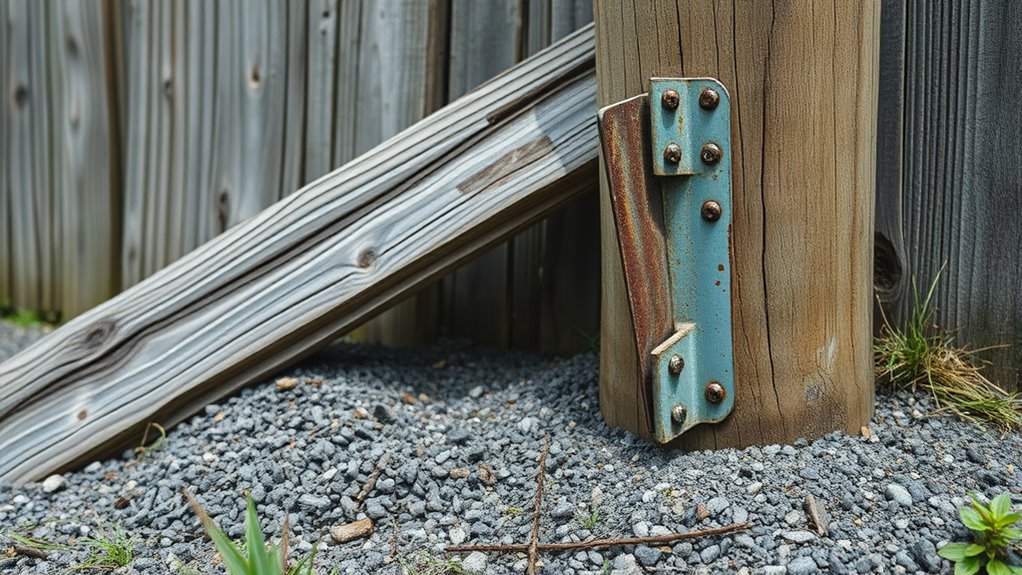
If you need a quick or less permanent fix for a leaning fence post, gravel and repair brackets offer practical alternatives. Gravel fills the hole, providing stability through compaction, ideal for temporary fixes or loose soil conditions. Picture a mound of small stones packed tightly around the base, holding the post upright. Repair brackets are metal supports that attach to the post and ground, offering immediate reinforcement without digging or concrete. Imagine sturdy brackets bolted to the side of your post, with stakes driven into the ground for extra hold. These options are quick to install and cost-effective, making them perfect for minor issues or when you plan to revisit the repair later. They help restore your fence’s appearance and function without extensive work.
Reinforcing Weak Posts With Additional Support

When repair brackets and gravel aren’t enough to stabilize a leaning or weak fence post, adding extra support can make a significant difference. One effective method is installing cross-bracing between posts, which helps distribute weight and stabilize the structure. You can also add wooden stakes driven into the ground beside the weak post, then connect them with braces or panels for reinforcement. Metal support brackets, bolted securely to the post and anchored into the ground, provide additional stability without removing the post. These supports are especially useful if the soil remains loose or if the post has minor damage. By combining these methods, you strengthen your fence’s foundation, prevent further leaning, and extend its lifespan without the need for complete replacement.
Maintaining Your Fence to Prevent Future Problems

Regular maintenance is essential to keep your fence sturdy and prevent costly problems down the line. You should routinely inspect your fence for signs of damage, such as rot, cracks, or leaning posts. Address issues early by tightening loose panels or replacing damaged sections. Keep soil around posts stable by ensuring proper drainage and avoiding excessive moisture buildup. To prevent future problems, consider:
Regular fence maintenance prevents damage and extends lifespan through inspections, repairs, and moisture control.
- Applying weatherproof sealant or termite-resistant treatments to extend post life
- Installing protective caps or coatings to shield posts from moisture and pests
- Regularly trimming nearby plants to prevent soil disturbance and root damage
Frequently Asked Questions
How Do I Prevent My Fence Posts From Leaning in the First Place?
To prevent your fence posts from leaning, make sure you install them at the correct depth—usually one-third of their length in the ground—and use proper backfill materials like gravel or concrete for stability. Guarantee the soil drains well to avoid erosion and avoid placing posts in areas prone to frost heave. Regularly inspect and maintain your fence, addressing any early signs of rot or soil shifting to keep your fence straight and sturdy.
What Tools Are Best for Realigning a Leaning Fence Post?
Tools for realigning a leaning fence post are like a toolbox of solutions. You’ll need a level to guarantee proper straightness, a crowbar or pry bar for leverage, and a sledgehammer to loosen or adjust the post. A post jack can help lift and stabilize the post. Wooden stakes and braces are essential for temporary support. Using these tools together, you can straighten your fence post efficiently and accurately.
How Long Does a Concrete Repair Typically Last?
A concrete repair typically lasts around 10 to 20 years if properly installed and maintained. You need to guarantee the concrete cures fully, which takes at least 24 hours, and choose the right mix for your climate. Regular inspections and addressing any cracks or signs of wear early can extend its lifespan. Proper drainage and avoiding soil erosion also help the concrete stay durable over time.
Can I Fix a Leaning Post Without Removing the Fence Panels?
Yes, you can straighten a leaning post without removing the fence panels. Imagine the post as a restless dancer—steady it with braces or stakes while you gently nudge it back into place. Use a level to guarantee it’s perfectly vertical, then secure it temporarily. Once stable, reinforce with concrete or gravel around the base. This way, you restore stability without dismantling your entire fence, saving time and effort.
When Should I Replace a Fence Post Instead of Repairing It?
You should replace a fence post if it’s severely rotted, cracked, or broken beyond repair. If the post wobbles excessively or shows signs of extensive decay, repair won’t hold, and replacement is necessary. When the post’s foundation is compromised or if previous repairs haven’t stabilized it, replacing guarantees safety and durability. Don’t hesitate to swap out the post if repairs can’t restore its strength and stability effectively.
Conclusion
If you catch a leaning fence post early, fixing it is straightforward. For example, Sarah noticed her fence sagging and used gravel and brackets to stabilize it, saving her hundreds on replacement costs. Regular inspections and timely repairs keep your fence sturdy and beautiful. Don’t ignore signs of damage—address issues promptly, and your fence will stand tall for years to come. With a little effort, you’ll maintain a secure, attractive boundary around your property.